Usage Guide
Step-by-step instructions for the Admin Console and Remotto Viewer.
Using the Admin Console
Access the server via browser and manage all devices
Login & Initial Setup
Logging in to the Admin Console
Access the admin console in your browser.
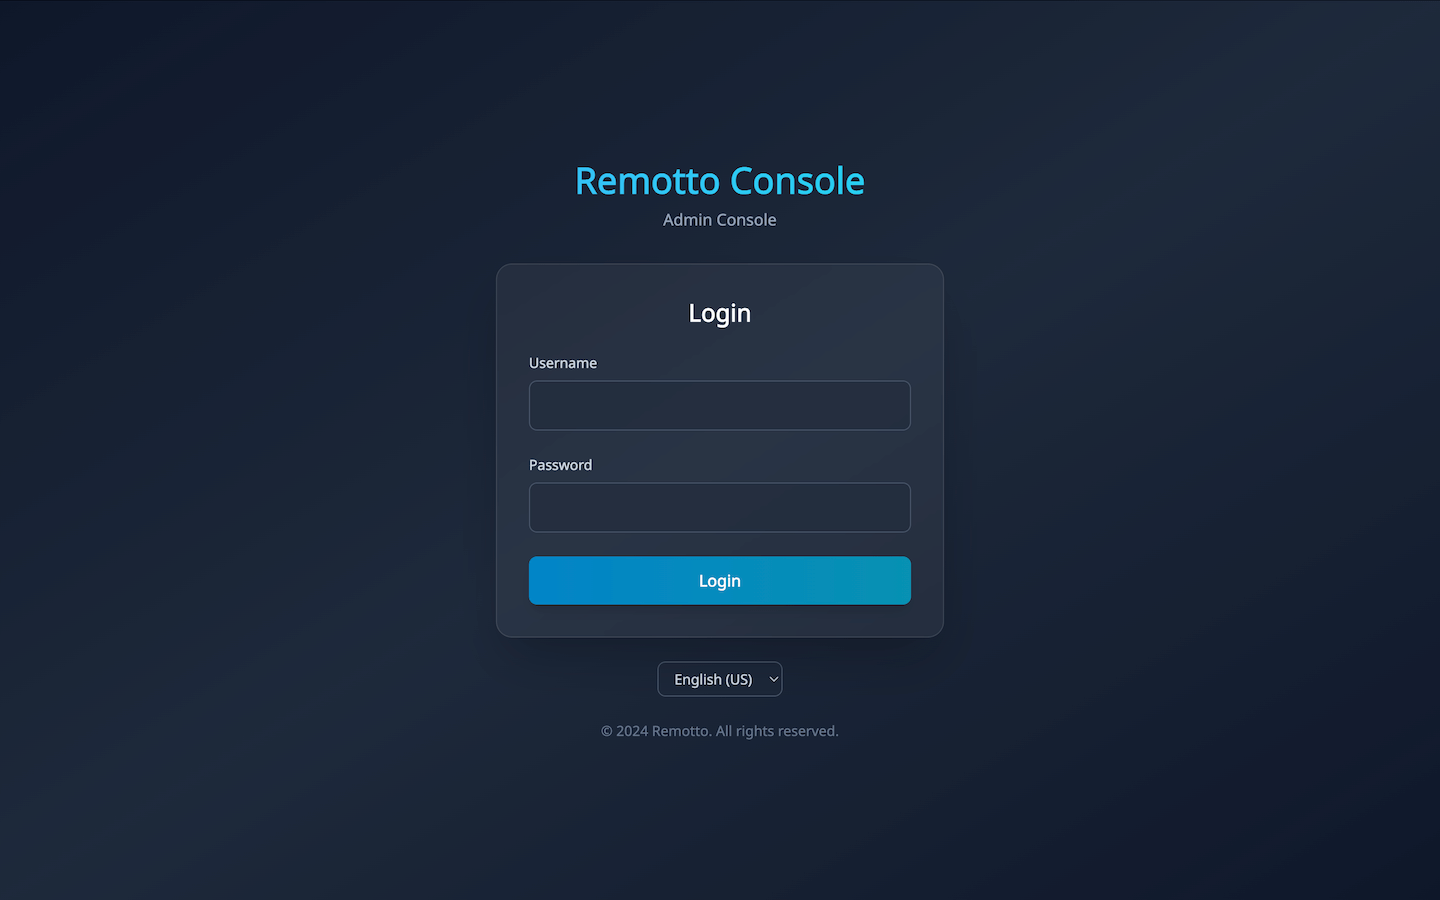
http://<server-ip>:8080/admin
Default login credentials:
Username: admin
Password: admin123
Dashboard
The dashboard displayed after login provides an at-a-glance view of the entire system status.
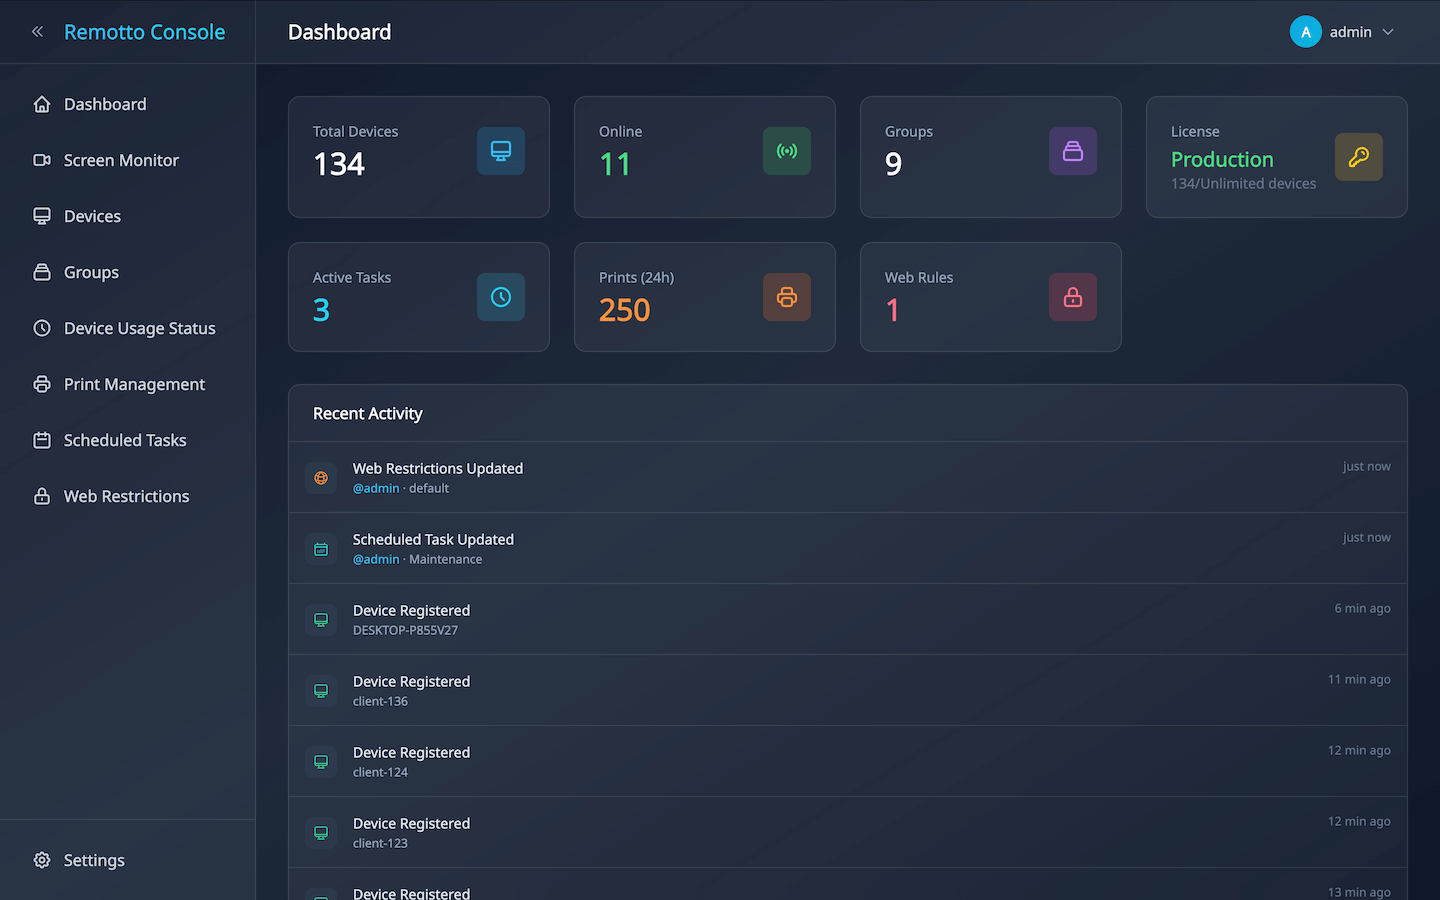
Statistics Cards — The following items are displayed as cards with auto-refreshing values:
- Total Devices / Online: Number of registered devices and currently connected count
- Groups: Number of created groups
- License: Trial / Licensed status and maximum device limit
- Scheduled Tasks: Number of configured scheduled tasks
- Print Pages (24h): Total pages printed in the last 24 hours
- Web Rules: Number of configured web access rules
Recent Activity — Displays admin operation history (who, when, and what was done) in chronological order.
Dashboard Best Practices
- Morning check: Verify devices are booted normally via the Online count card
- Print monitoring: Check recent print volume via the Print Pages card
- Audit trail: Review other administrators’ actions via the Activity log
Device Management
Device List
All registered devices are displayed in a table. Each row shows hostname, group, logged-in user, IP address, MAC address, and role.
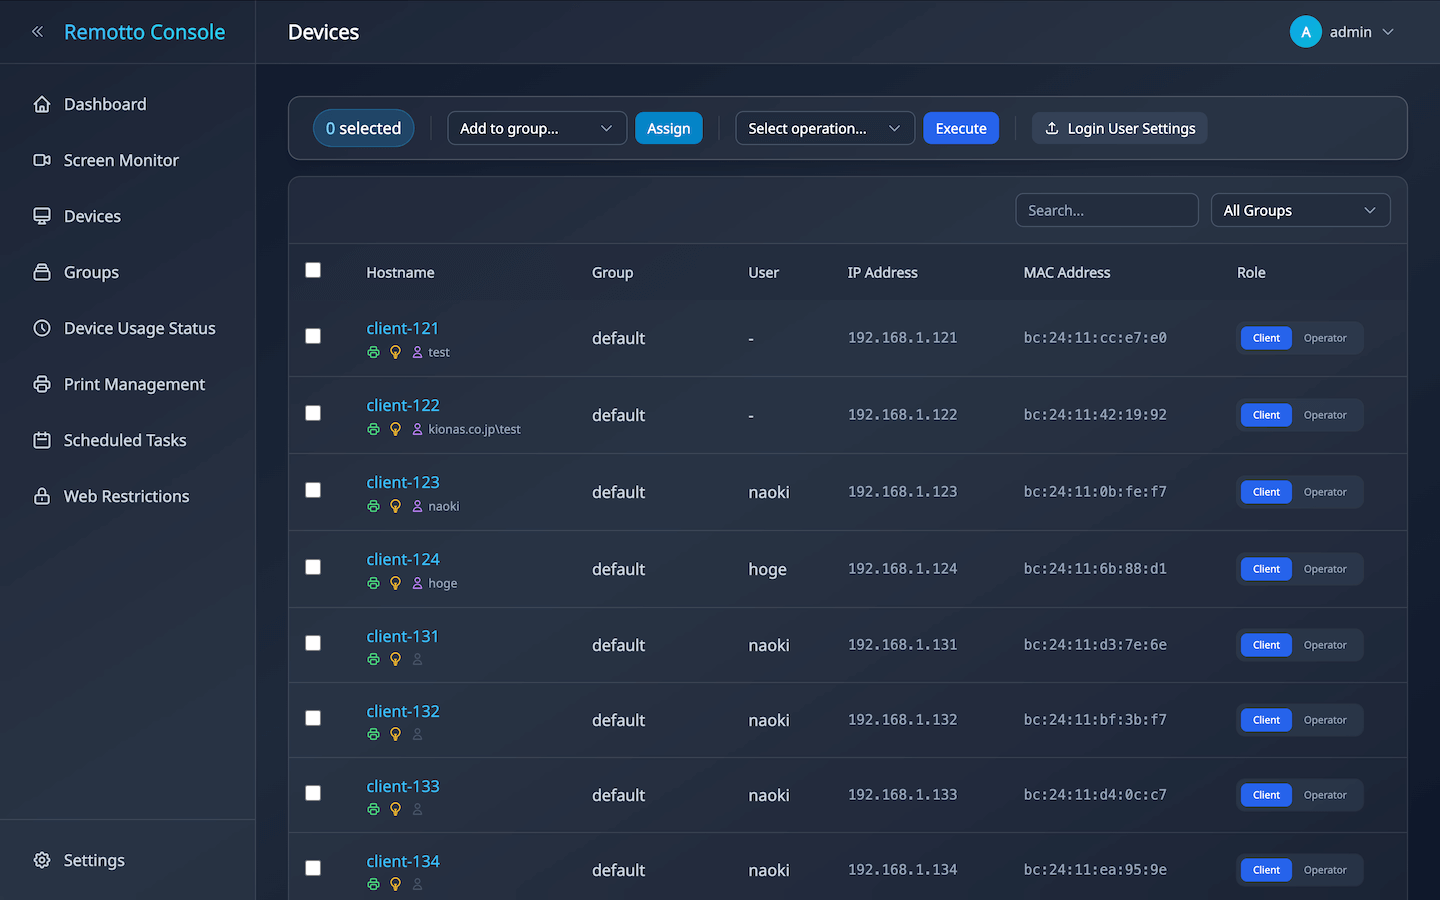
- Search & Filter: Text search plus group filtering
- Bulk Operations: Select multiple devices with checkboxes to perform power operations, group assignment, settings changes, or deletion
- Device Details: View hardware info including OS, CPU, memory, and disk capacity
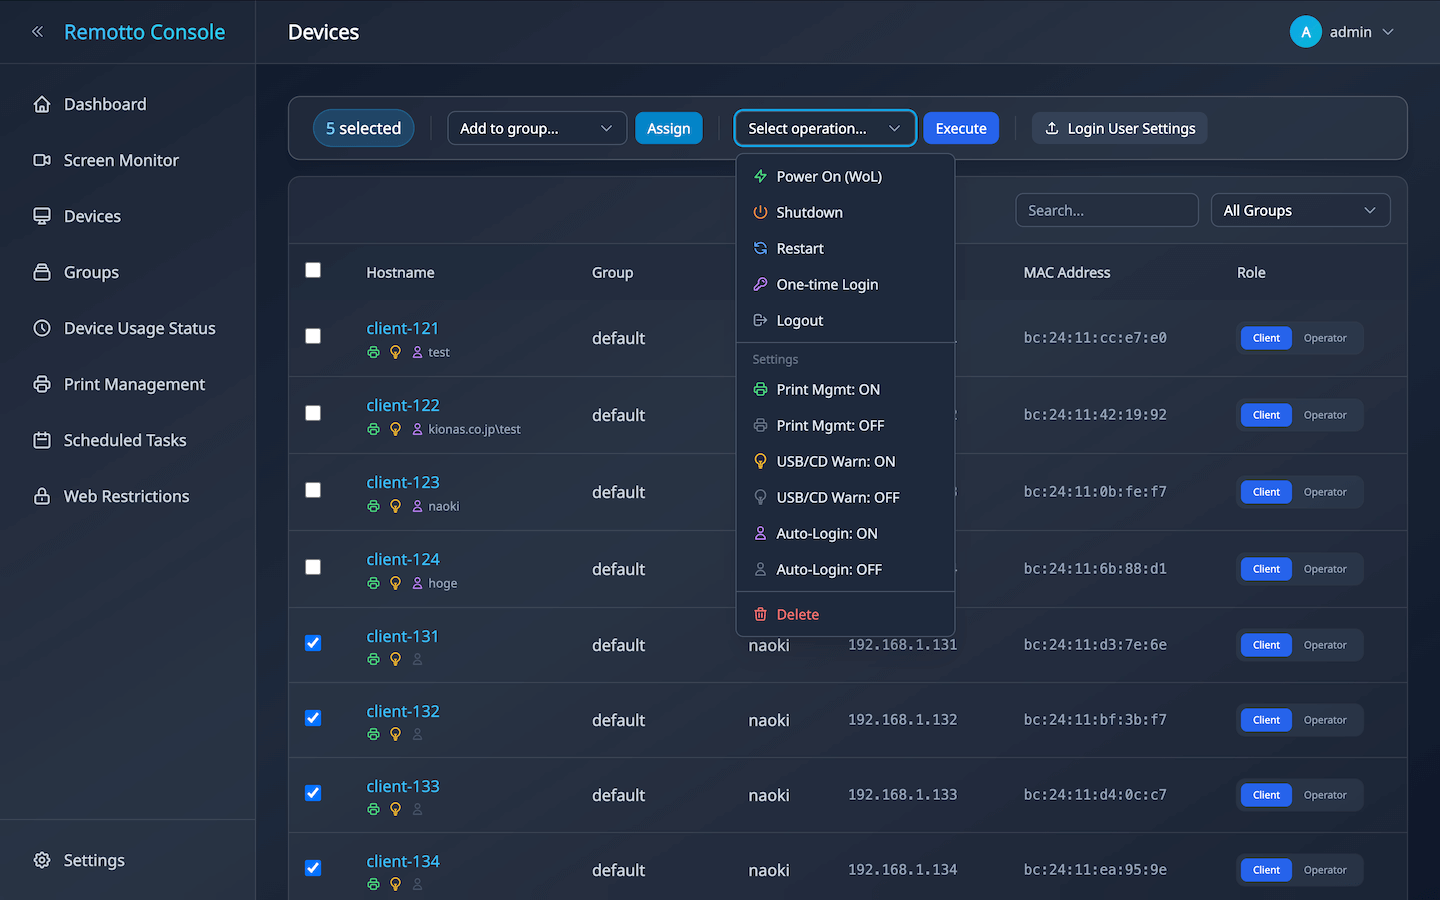
Bulk Operation Steps
- Select target devices using the checkboxes in the device list (header checkbox selects all)
- Choose an action from the “Select Action” dropdown:
- WoL / Shutdown / Restart / Logout: Power operations
- USB Warning ON/OFF / Auto-Login ON/OFF: Device settings
- Delete: Remove selected devices from management
- Group Assignment: Select a target group from the group dropdown
- Click the “Execute” button → confirm in the dialog and execute
Role Switching (Client / Operator)
Each device can be assigned a Client or Operator role. Switch using the toggle button in the device list.
Client (Monitored)
Screen is streamed to Remotto Viewer for remote monitoring and control. Set regular user devices to this role.
Operator (Controller)
Uses Remotto Viewer to monitor and control client device screens.
Power Operations
Select target devices from the device list with checkboxes and execute power operations.
Wake-on-LAN
Remotely power on devices over the network. Supports relay across subnets.
Shutdown
Shut down selected devices.
Restart
Bulk restart devices. Useful after applying updates.
One-Time Login
Automatically log in to a device with specified credentials. One-time only for security.
• One-Time Login — Logs in automatically once, then returns to the normal login screen.
• Auto-Login — Logs in automatically with the same account every time.
CSV Import for Login User Settings
Bulk-register login user information per device via CSV file.
CSV Format
hostname,mac_address,username,password
PC-001,00:1A:2B:3C:4D:5E,student01,pass1234
PC-002,00:1A:2B:3C:4D:5F,DOMAIN\teacher01,DomainPass
PC-003,00:1A:2B:3C:4D:60,user@school.local,password| Column | Description | Example |
|---|---|---|
hostname | Device hostname (reference only) | PC-001 |
mac_address | Target device MAC address (: or - delimited) | 00:1A:2B:3C:4D:5E |
username | Login username | student01 |
password | Login password | pass1234 |
Import Steps
- Download CSV template from the “Devices” screen (exports registered device list)
- Edit the
usernameandpasswordcolumns in the downloaded CSV - Upload the edited CSV to see a preview of the changes
- Review and execute the import
• Records with the same MAC address will be overwritten (supports updating existing settings)
• Rows with empty
username and password will be skipped• MAC address delimiters can be either
: or -• “Wake-on-LAN” must be enabled in the target device’s BIOS/UEFI
• “Wake on LAN by Magic Packet” must be enabled in the network adapter settings
• Target device must be connected via wired LAN (Wi-Fi is not supported)
• To wake devices on a different subnet, an active Remotto client on the same subnet is required (acts as relay)
Group Management
Organize devices into groups. Set streaming quality per group and apply to all member devices.
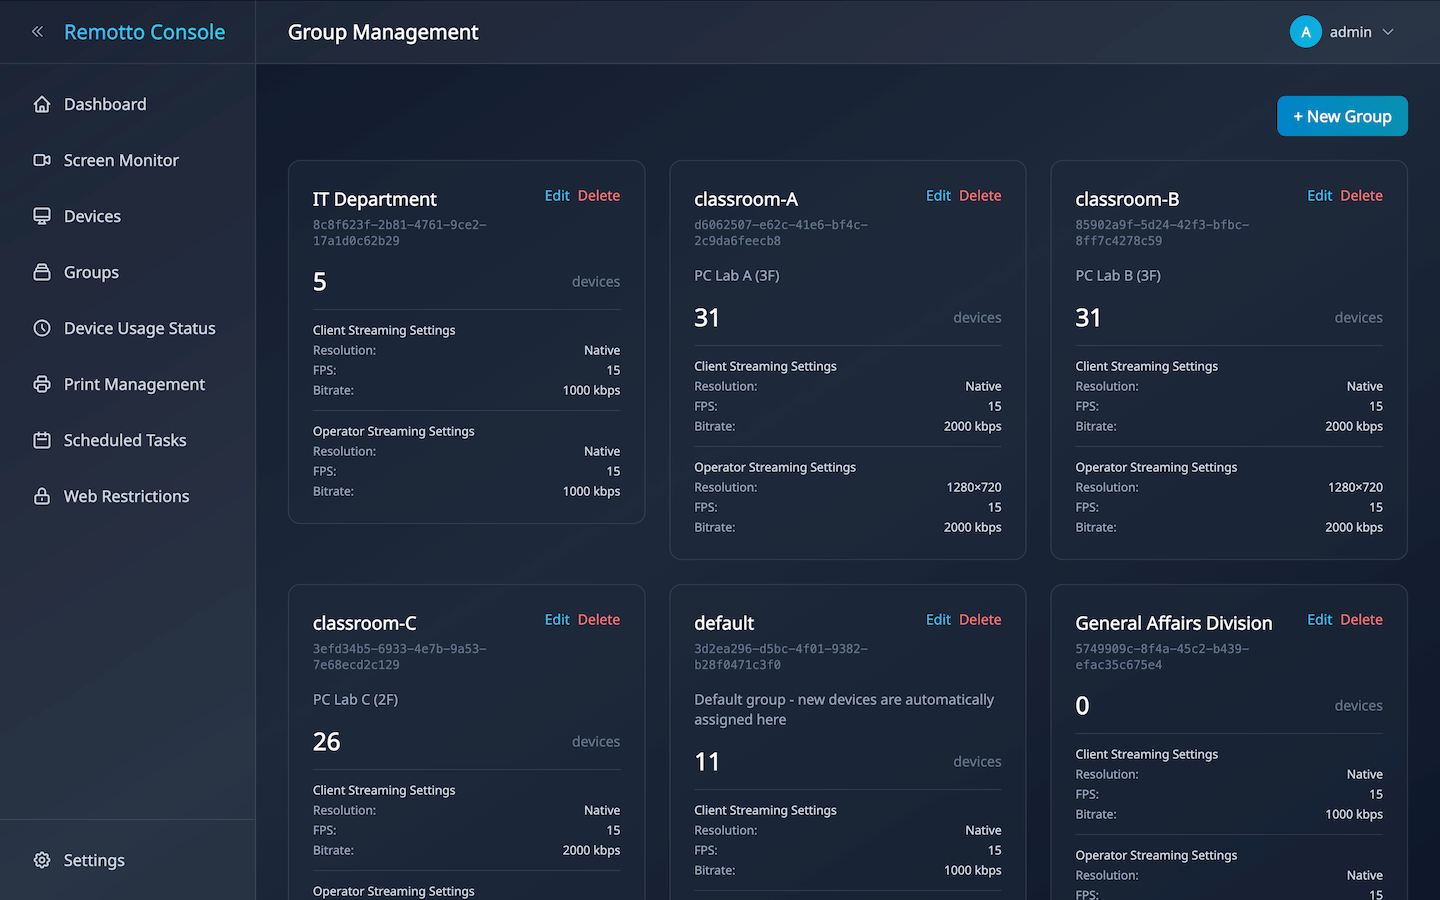
- Create Group: Enter group name and description
- Edit Group: Change name/description and streaming quality settings (see below)
- Assign Devices: Use bulk operations in the device list to assign groups
- Delete Group: Remove unused groups
Streaming Settings
The group edit screen has “Client Settings” and “Operator Settings” tabs, each with independent quality controls.
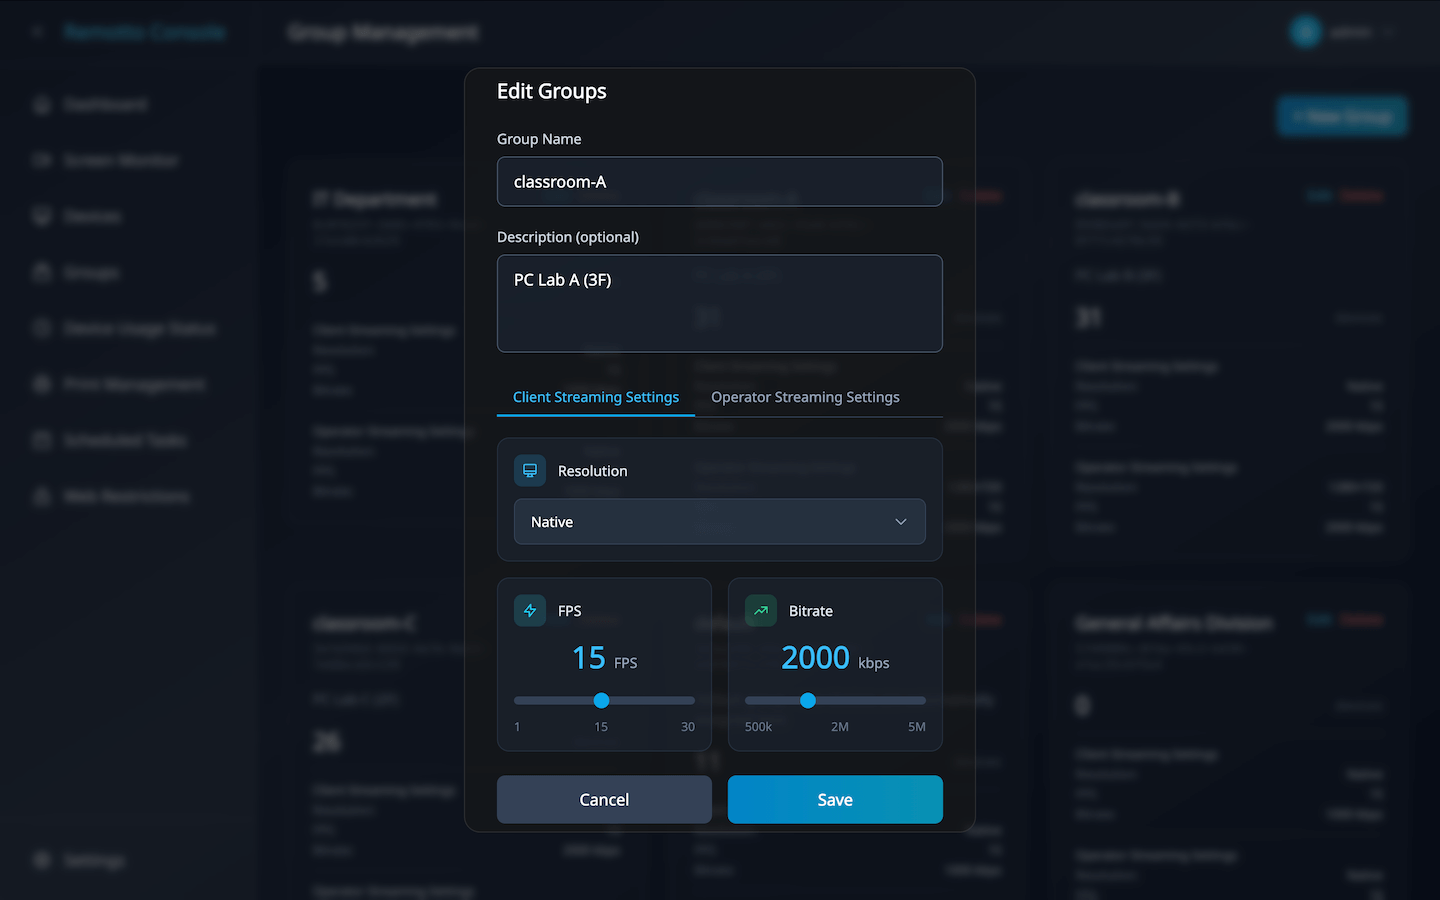
Client Device Streaming Settings
Controls the streaming quality when viewing client screens in Viewer’s display mode.
| Setting | Options | Default | Description |
|---|---|---|---|
| Resolution | native / 1920×1080 / 1280×720 / 854×480 / 640×360 | native | Stream resolution. native uses the device’s desktop resolution |
| FPS | 1–30 (slider) | 15 | Frames per second. Lower values reduce network load |
| Bitrate | 500–5000 kbps (slider, 100 steps) | 2000 | Maximum video bitrate. Higher is better quality but uses more bandwidth |
Operator Device Streaming Settings
Controls the quality when an operator shares their screen to client devices via Viewer. Can be adjusted independently from client settings for clear demos and instructions. Same settings and options as client settings.
Recommended Settings
| Use Case | Target | Resolution | FPS | Bitrate |
|---|---|---|---|---|
| Daily screen monitoring | Client | 1280×720 | 10 | 500 kbps |
| Screen share (demo/instruction) | Operator | native | 20 | 1500 kbps |
| Limited bandwidth environment | Client | 854×480 | 5 | 500 kbps |
• Settings are applied per group. All devices in the group receive the same configuration
•
native resolution streams at the device’s desktop resolution, which may consume more bandwidth• Changes take effect at the next streaming session start
Scheduled Tasks
Set up daily, weekly, or one-time tasks to automate power operations.
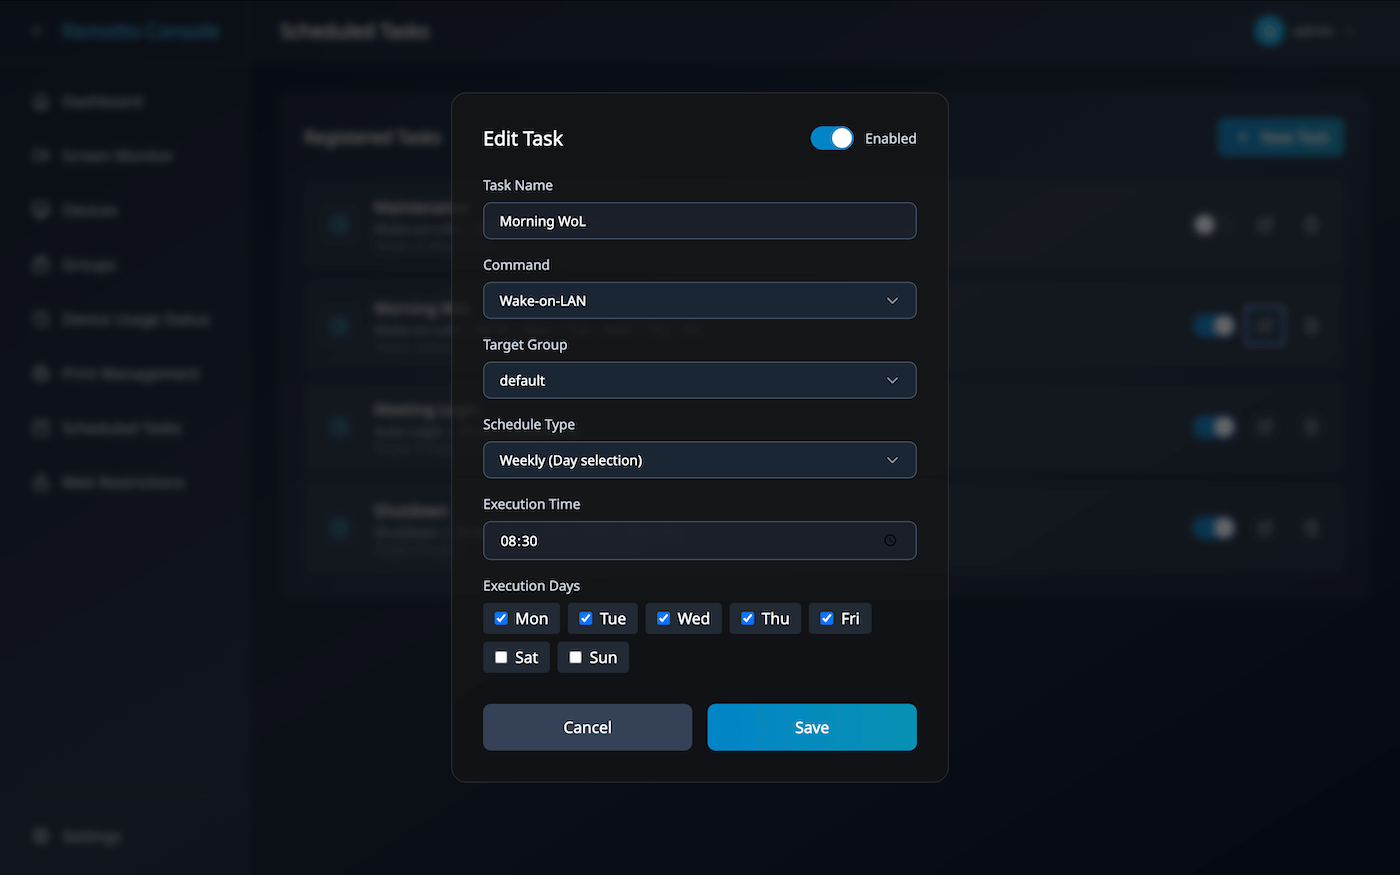
Creating a Task
Create new tasks from the “Tasks” screen in the admin console. Configure the following:
Basic Settings
| Item | Description |
|---|---|
| Task Name | A name to identify the schedule (e.g., “Daily 6PM Shutdown”) |
| Command | Select the operation to execute (see below) |
| Target | Specify a group |
Available Commands
| Command | Action |
|---|---|
| Wake-on-LAN | Send magic packet to wake target devices |
| Shutdown | Shut down target devices |
| Restart | Restart target devices |
| Auto-Login | Log in to target devices using pre-registered credentials |
Schedule Types
| Type | Setting | Description |
|---|---|---|
| Daily | Time (HH:MM) | Runs automatically at the specified time every day |
| Weekly | Day(s) + Time | Runs on specified day(s) at the specified time (multiple days selectable) |
| One-time | Date (YYYY-MM-DD) + Time | Runs once at the specified date and time |
Day Selection (Weekly)
Select one or more days of the week (Mon–Sun) for execution.
Configuration Examples
| Scenario | Command | Schedule |
|---|---|---|
| Auto-shutdown at end of business day | Shutdown | Daily 18:00 |
| Auto-wake every Monday morning | Wake-on-LAN | Weekly Mon 07:30 |
| Scheduled maintenance restart | Restart | Weekly Sat 22:00 |
| Auto-login before an event | Auto-Login | One-time (specify date/time) |
• Toggle each task’s enabled/disabled status directly from the task list
• One-time tasks remain as records after execution but will not run again
• Last execution time is shown in the list for monitoring
• WoL requires BIOS/UEFI and network adapter WoL to be enabled on target devices
Security & Restrictions
Web Access Restrictions
Set web access rules per group. Filtering is done at the domain level using a local proxy on client devices.
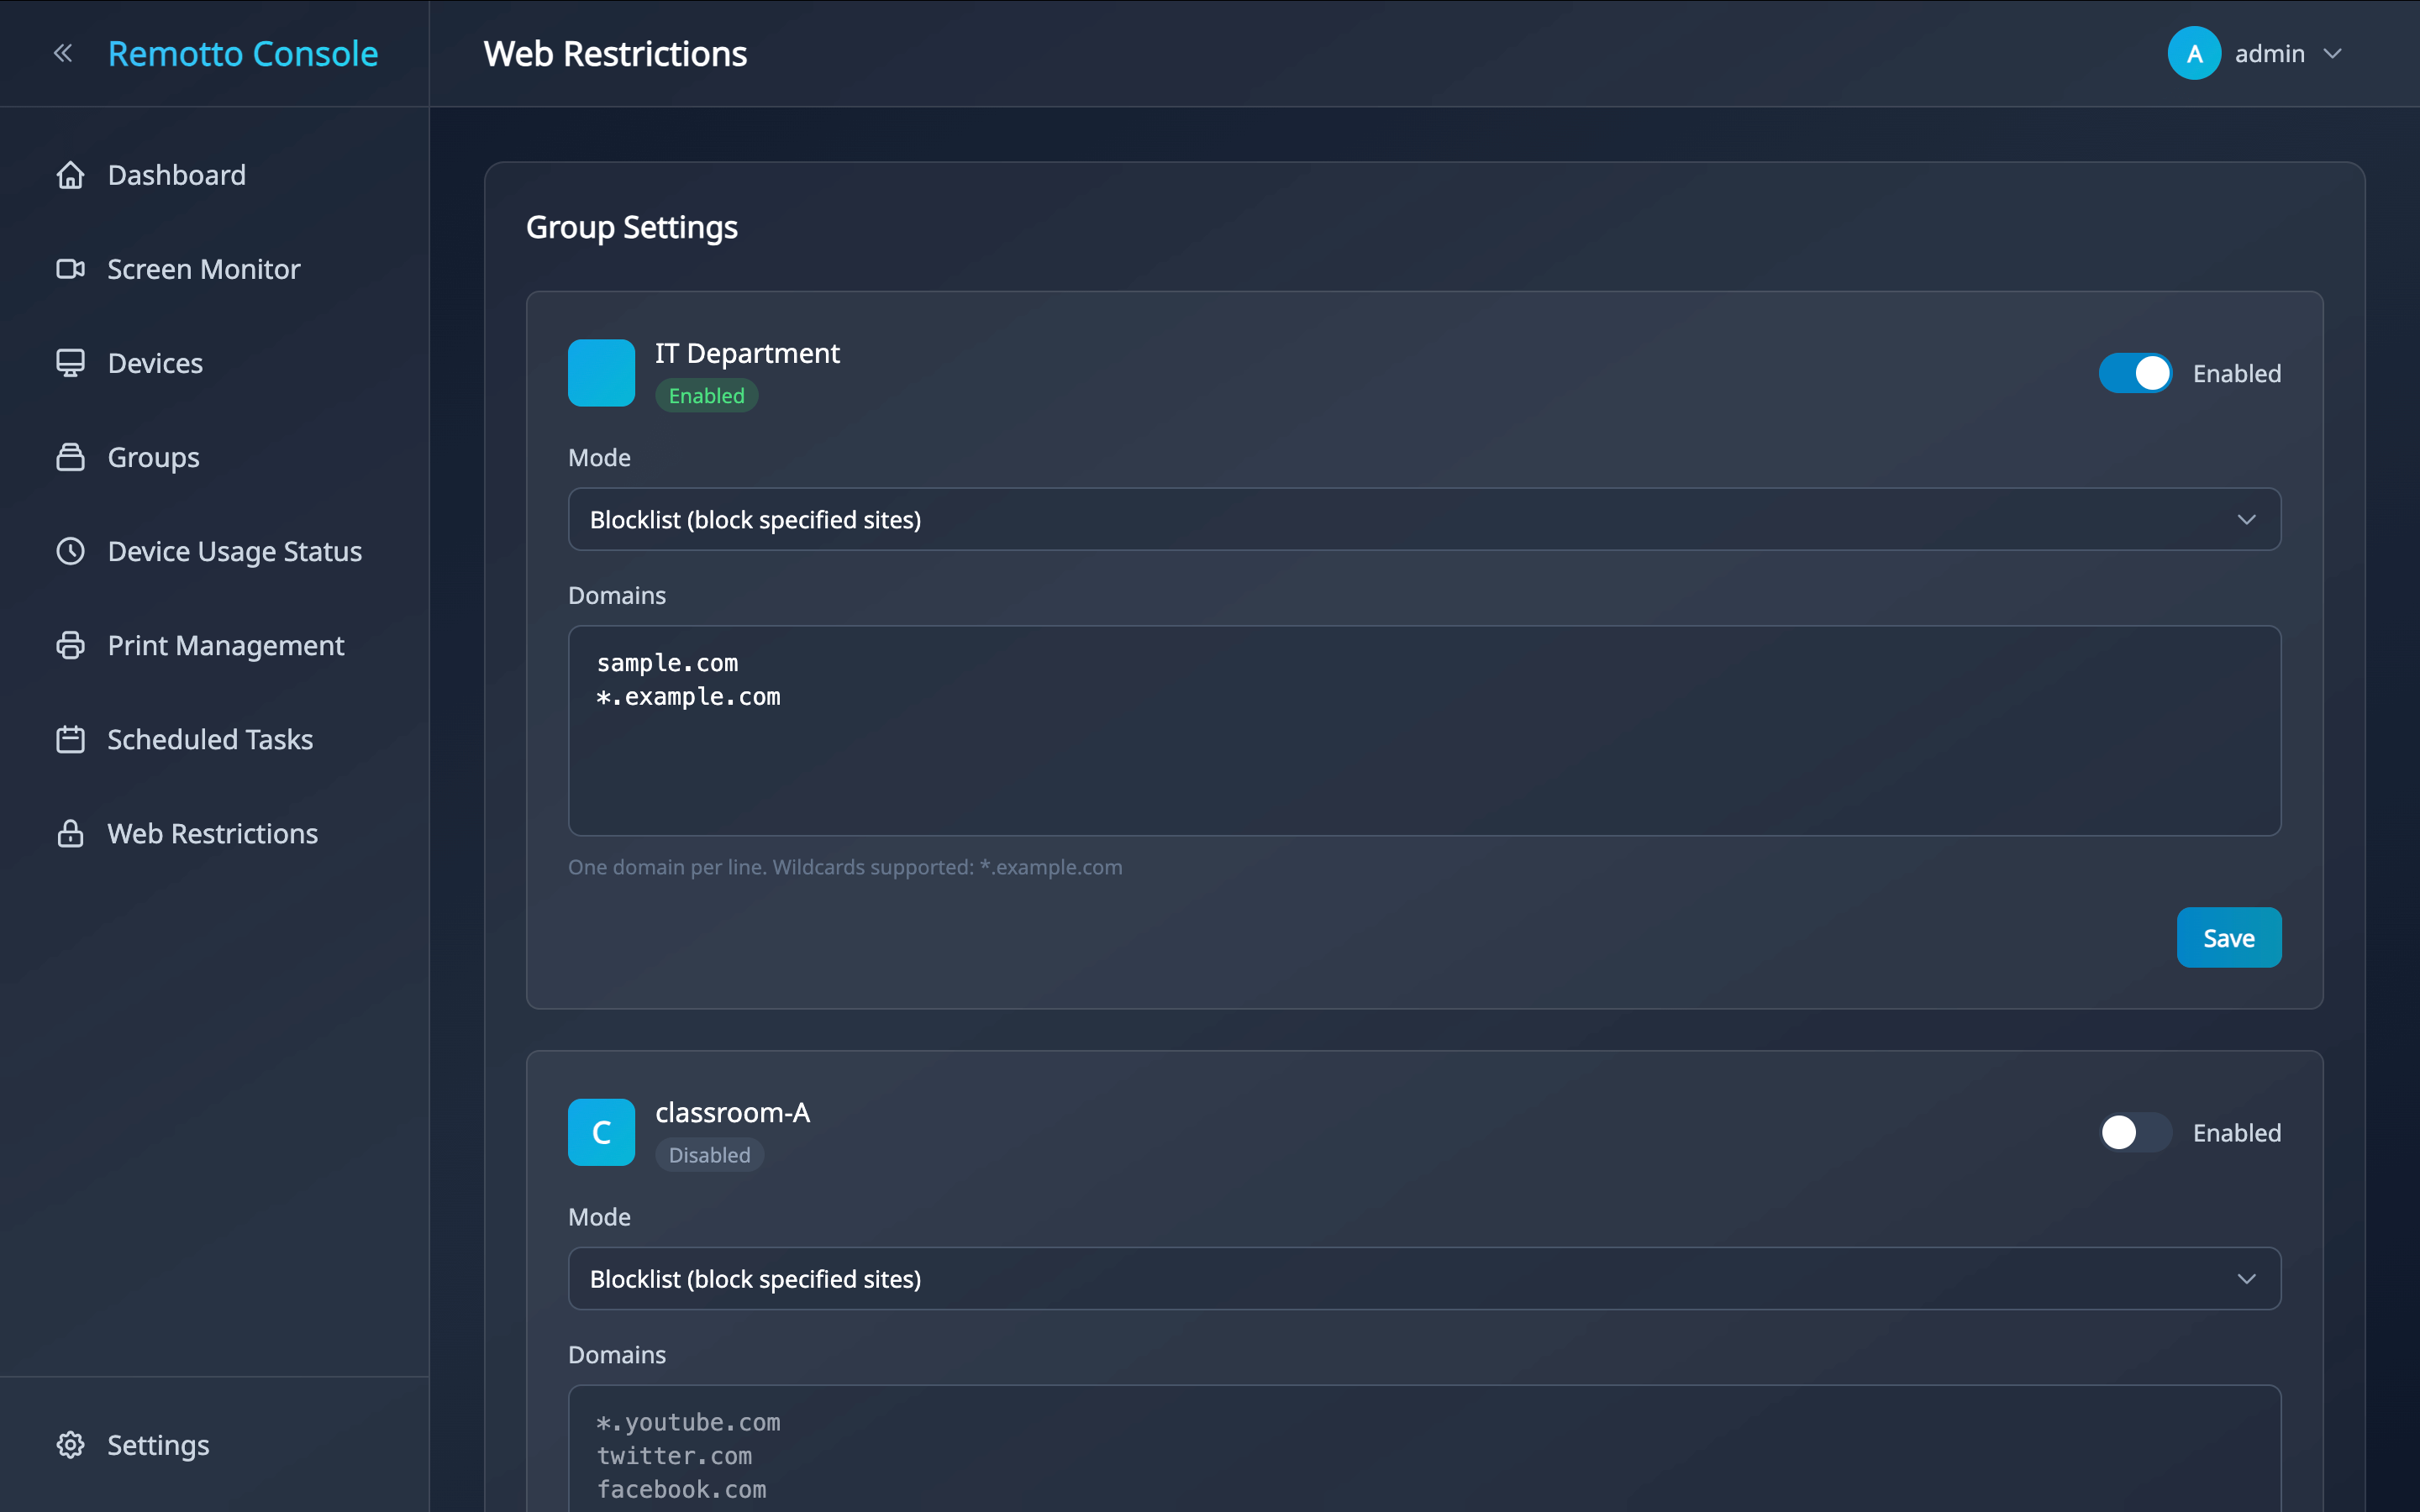
Filter Modes
Choose from two filter modes:
| Mode | Behavior | Use Case |
|---|---|---|
| Block List (Default) | All sites allowed except listed domains | Block specific sites (SNS, gaming, etc.) |
| Allow List | All sites blocked except listed domains | Restrict to specific sites only (exam environments, etc.) |
Setup Steps
- Click “Groups” in the sidebar
- Click the edit button for the target group
- Switch to the “Web Restrictions” tab
- Toggle the enabled/disabled switch to activate
- Select Block List or Allow List mode
- Enter domain names (one per line)
youtube.com
twitter.com
instagram.com
• Web restriction settings are automatically pushed to client devices
• Remotto management traffic is not affected
• HTTPS traffic is also filtered at the domain level
Print Management
Automatically track print page counts per user and set print limits.
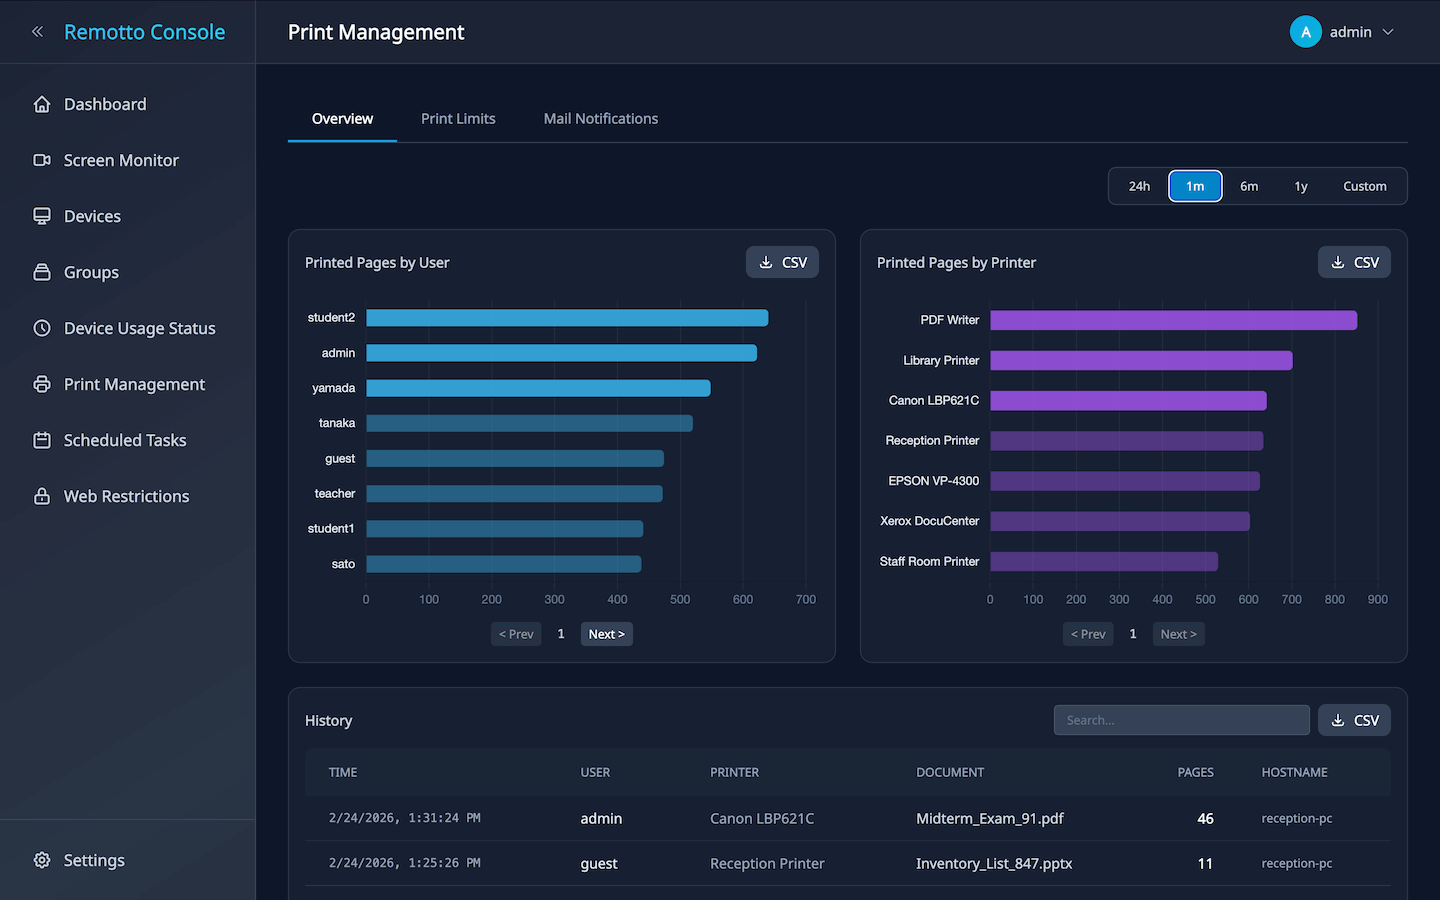
- Print Quota: Set per-user page limits; auto-block when exceeded
- Per-Job Limit: Set a global maximum page count per print job in the print settings screen; toggle on/off with a switch
- Print Log: Record who printed what, when, and how many pages (includes document and printer name)
- CSV Export: Export print history to CSV
- Block Notification: When printing is blocked, a balloon notification is shown on the client device with the reason (quota exceeded / job limit exceeded)
📧 Email Notification Templates
Automatically send email notifications when print quota warnings or limits are reached. The following placeholders can be used in the email body:
Available Placeholders
| Placeholder | Description | Example |
|---|---|---|
{username} | Target user’s login name | student01 |
{used_pages} | Pages used this month | 85 |
{limit_pages} | Configured page limit | 100 |
{remaining_pages} | Remaining printable pages | 15 |
Notification Types
| Type | Trigger |
|---|---|
| Warning Email | When usage reaches the configured threshold (default: 80%) |
| Limit Exceeded Email | When usage reaches the limit and printing is blocked |
Template Example
Embed placeholders in the subject and body to automatically insert per-user information:
Subject: [Print Quota Warning] {username}

Body:
Dear {username},

Your print quota is running low.

• Used: {used_pages} pages
• Limit: {limit_pages} pages
• Remaining: {remaining_pages} pages

Printing will be blocked when the limit is reached.
Please contact your administrator with any questions.
CSV Import for Print Quotas
Bulk-register or update per-user print quotas (page limits, email addresses) via CSV file.
CSV Format
username,mail_address,used_pages,limit_pages,operation
student01,student01@school.local,0,100,update
student02,student02@school.local,45,200,update
old_user,,0,0,delete
reset_user,reset@school.local,80,100,reset| Column | Description | Required |
|---|---|---|
username | Login username | ○ |
mail_address | Notification email address | ○ (not required for delete) |
used_pages | Current used pages (reference; ignored during import) | — |
limit_pages | Page limit (number) | ○ (not required for delete) |
operation | Operation type (see below). Defaults to update | — |
Operation Types
| Value | Action |
|---|---|
update (default) | Create new user or update existing user’s email/limit |
delete | Delete the user’s print quota settings |
reset | Reset the user’s used pages to 0 (limit unchanged) |
Import Steps
- Download CSV template from “Print Management” → “Users” tab (exports current quota list)
- Edit the CSV columns (add users, change limits, set email addresses)
- Upload the edited CSV to see a preview
- Review and execute the import
• Records with the same username will be overwritten
• If the
operation column is omitted, update is assumed• Rows with errors are skipped; error details are included in the response
USB/CD Media Warning
When USB drives or CDs are still connected during shutdown/restart, a full-screen warning is displayed to pause shutdown and prompt removal.
- Warning Screen: Lists connected device names with “Cancel Shutdown” and “Continue Shutdown” buttons
Enable/Disable Steps
- Open the “Devices” screen in the admin console
- Select target device(s) with checkboxes (multi-select supported)
- From the “Select Action” dropdown, choose “USB Warning ON” or “USB Warning OFF”
- Click “Execute”
Screen Monitor
Browser-Based Screen Monitor
From the admin console’s “Monitor” screen, view client device screens in real-time right in your browser — no need to install Remotto Viewer.
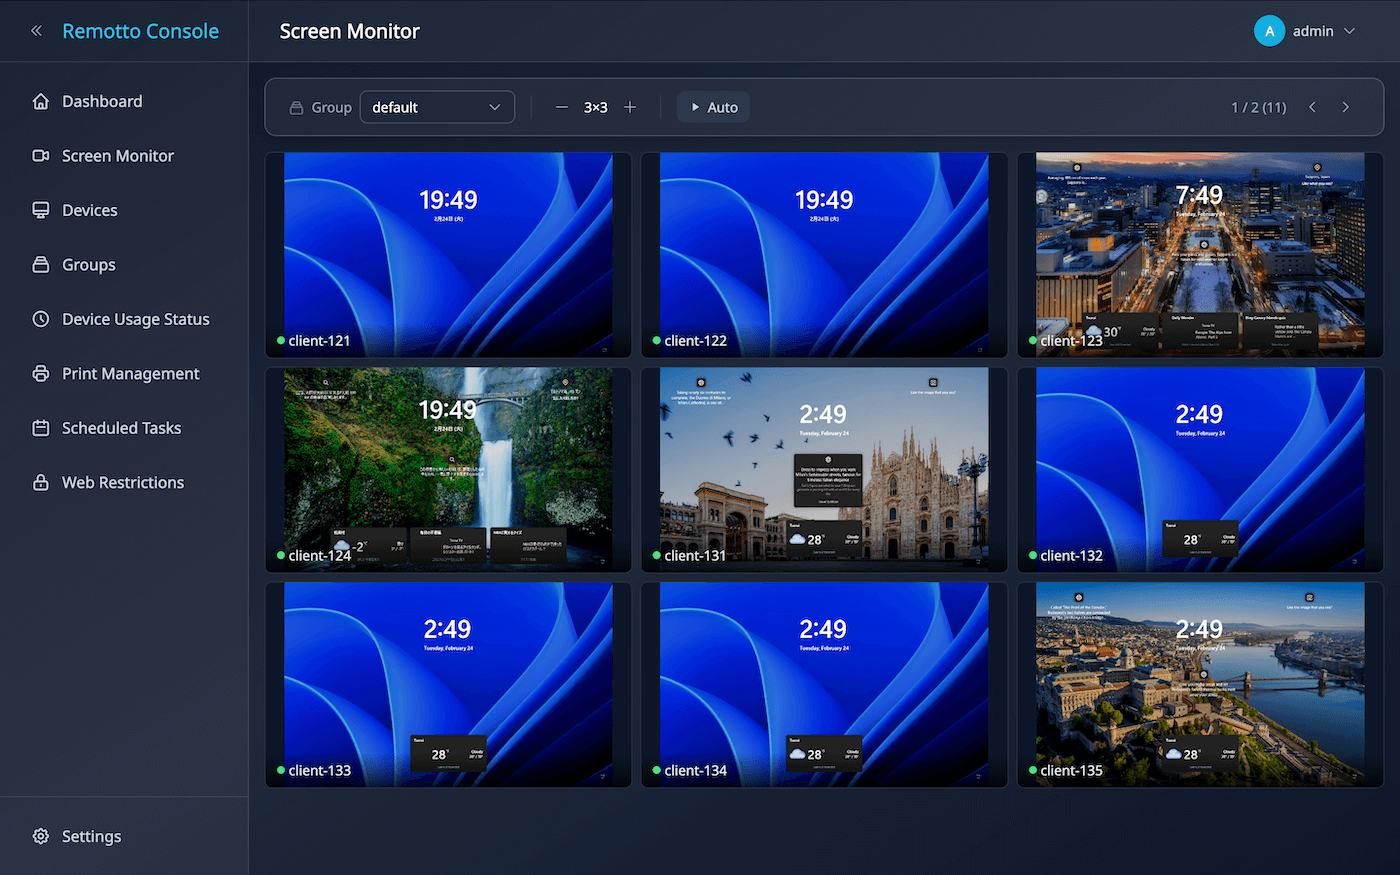
Controls
- Group Selection — Choose a group from the dropdown. “All Groups” shows all devices
- Grid Size — Use
−+buttons to change grid from 1×1 to 5×5 - Pagination — Devices that don’t fit the grid are auto-paged; use
◀▶to navigate - Auto-scroll — “Auto” button enables 10-second automatic page rotation
• Screen Monitor is view-only. For remote control, use Remotto Viewer
• Stream quality follows the group’s streaming settings (resolution, FPS, bitrate)
Reports & Audit
Activity Logs & Usage History
View device utilization and print records from the “Device Usage” and “Print Management” screens.
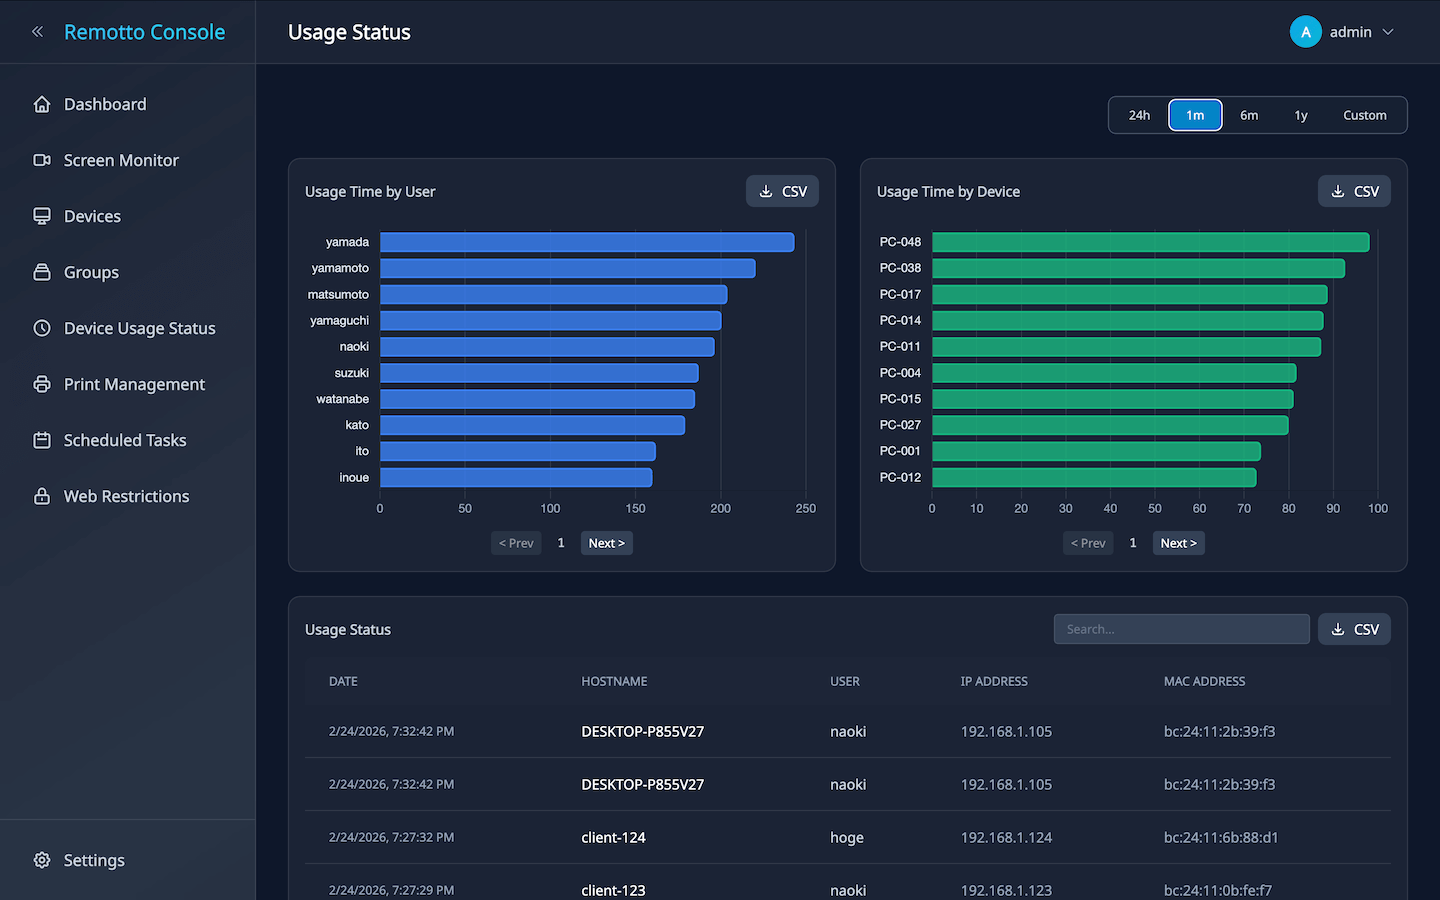
- Login History: View login/logout times per device by date. Track usage duration per device
- Usage Ranking: Display device operating hours in ranking format for a specified period
- Print Log: Record of who printed what, when, and how many pages (includes document and printer name)
- Print Quotas: Overview of each user’s current print count and limit
Search & Filter Steps
- Click “Device Usage” or “Print Management” in the sidebar
- Use the filter bar at the top to search by device or username
- Specify a date range (start and end dates)
- Results are displayed in the table
CSV Export
Download the following data in CSV format:
- Open the target screen (Device Usage or Print Management)
- Apply filters and date range as needed
- Click the “CSV Export” button in the upper right
- The CSV file will be downloaded
| Category | Data Type | Contents |
|---|---|---|
| Device Management | Login History | Login/logout times per device |
| Device Operating Hours | Cumulative usage time ranking per device | |
| Print Management | Print Log | Print job details (document name, printer, pages, etc.) |
| Print Quotas | Current print count and limit per user |
Settings
User Management
Create and manage user accounts for logging in to the admin console.
- Local Accounts: Create with username and password
- LDAP Accounts: When LDAP integration is enabled, LDAP-authenticated users are auto-registered on first login
Account Creation Steps
- Click “Settings” in the sidebar
- Select the “Users” tab
- Click “Add User” in the upper right
- Enter the following in the dialog:
- Username: Login ID
- Password: Set initial password
- Click “Create” to complete
LDAP / Active Directory Integration
Connect with external directory services to enable admin console login using existing accounts.
- Connection Settings: Specify LDAP server host, port, and base DN
- SSL Support: LDAPS (port 636) encrypted communication supported
- Enable/Disable: Toggle switch for instant on/off
Email Notification Settings
Configure SMTP connection for sending print quota warning and limit notifications.
- SMTP Server: Set host, port, auth user, and password
- Encryption: SSL / TLS (STARTTLS) supported
- Sender: Set sender name and email address
License Management
Register a license key to expand the number of manageable devices.
- Trial: Up to 5 devices without a license (basic features only)
- License Registration: Enter license key from the settings screen to activate
- Expiration: When license expires, existing device data is preserved but reverts to trial (5 devices, basic features)
License Key Registration Steps
- Click “Settings” in the sidebar
- Select the “License” tab
- Click “Choose File” and upload the license key file (
.keyor.txt) received at purchase - Click “Import”
- After successful registration, license info (plan, device limit, expiry) is displayed
Using Remotto Viewer
Monitor and control devices with the desktop application
Remotto Viewer is a desktop application for operators, provided separately from the admin console (browser). View client device screens in a grid layout, and control them remotely (mouse & keyboard). Also supports screen sharing and file distribution.
Display Mode & Control Mode
Display Mode
View connected device screens as thumbnails in a grid for simultaneous monitoring.
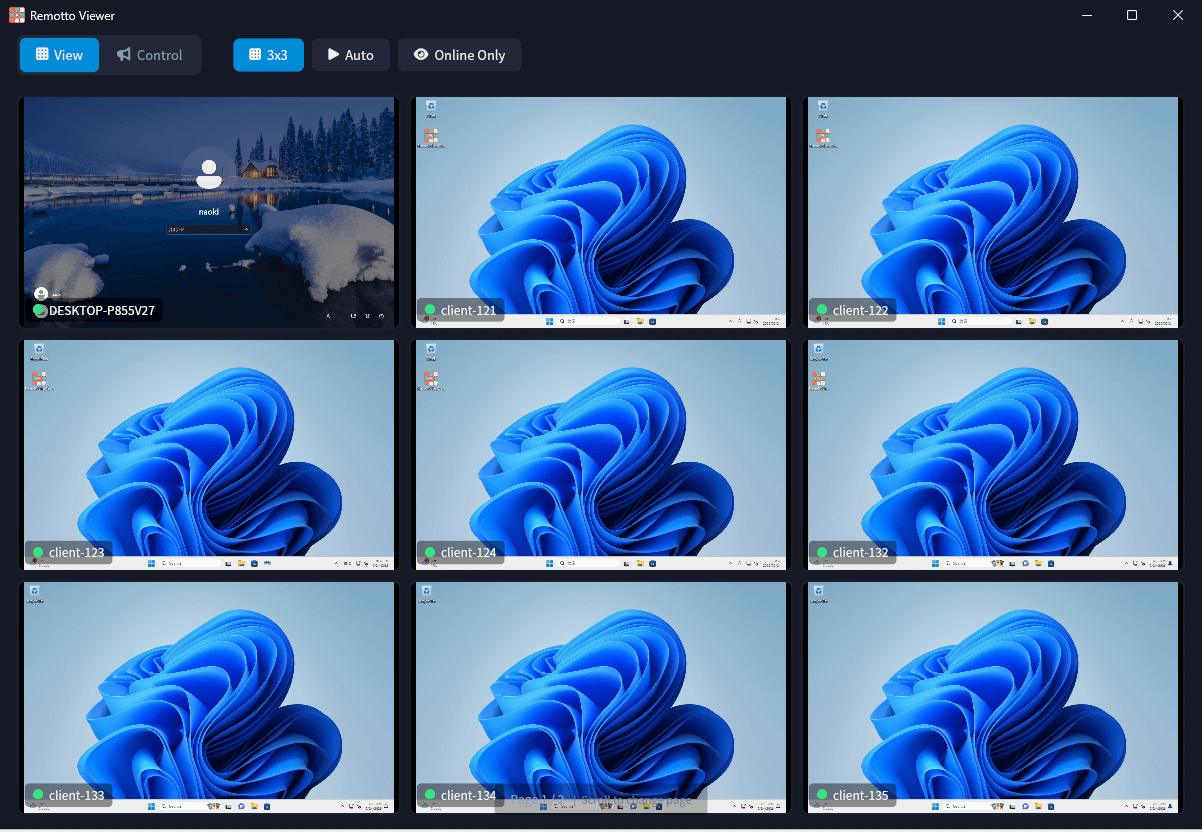
- Grid View: Switch between 1×1 / 2×2 / 3×3 / 4×4 / 5×5
- Auto-Paging: Devices that don’t fit the grid are automatically paginated
Control Mode Features
Double-click a thumbnail in display mode to switch to control mode.
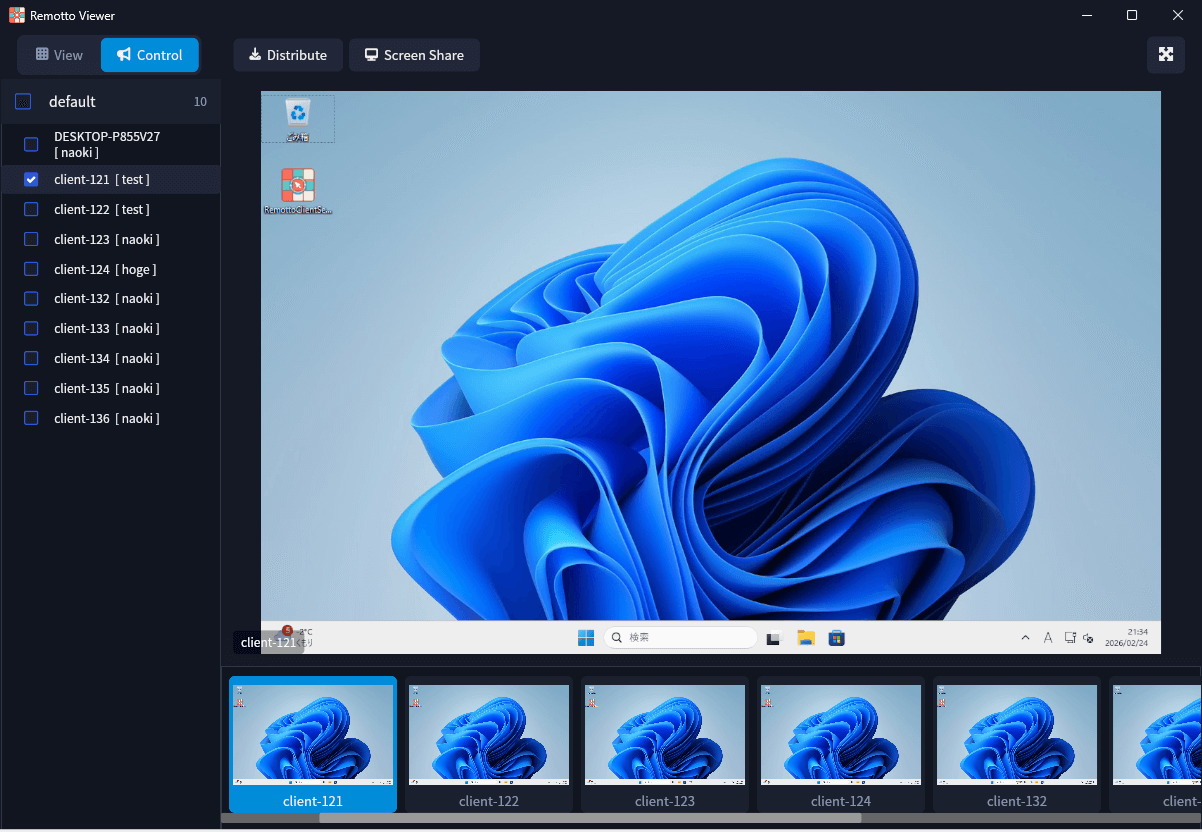
- Mouse Control: Click, drag, and scroll are forwarded directly
- Keyboard Input: Keystrokes are forwarded in real-time
Screen Share & File Distribution
Screen Share
Stream the operator’s screen to client devices in real-time.
- Click the Screen Share button in the Viewer toolbar
- Select what to share:
- Desktop: Share the entire screen
- Window: Share a specific window only
- Region: Drag to select an area of the screen to share
- After selection, it’s displayed in real-time on client devices in the same group
- To stop sharing, click the Screen Share button again
• Presentation delivery
• Operation procedure demonstrations
File Distribution
Distribute files or folders to selected client devices from within the Viewer.
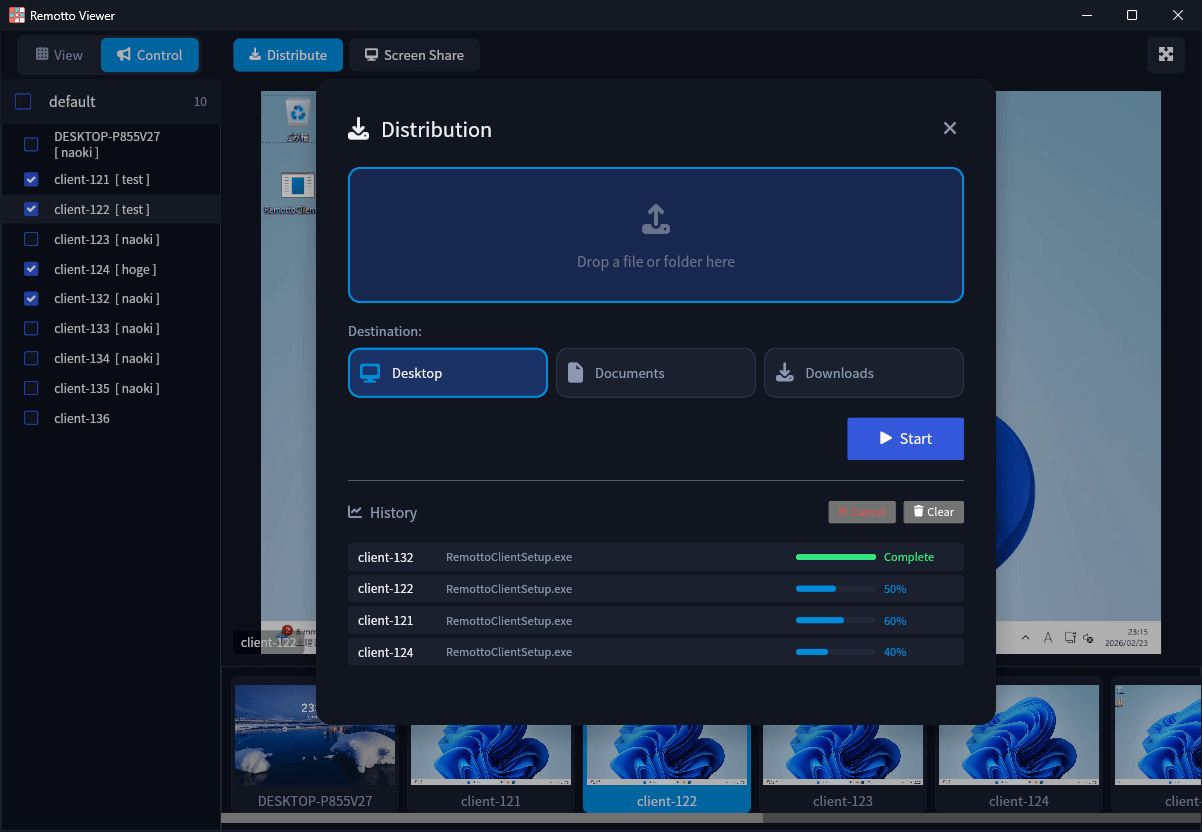
- Click the File Distribution button in the Viewer toolbar
- Select files or folders to distribute
- Choose the destination:
- Desktop
- Documents
- Downloads
- Start distribution — a progress bar shows real-time distribution status